6 Tips To Pass Your Mountain Leader Assessment
One of the first major milestones for someone starting their career in the mountains is earning the Mountain Leader award. The award is designed to train and assess individuals in the skills and knowledge required to safely lead others in the upland environment.
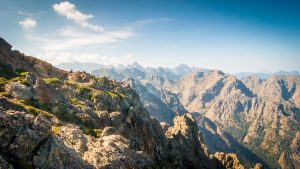
The Mountain Leader assessment consists of three days spent in the hills, wild camping and navigating by day and night. Participants are continuously assessed on all elements of their mountain skills by a pair of highly experienced and qualified mountaineers. The assessment takes place bi-annually in March and November to ensure that participants can handle challenging weather conditions.
The standards for the assessment are high, and with all of these stressful variables, the experience can seem quite daunting, but don’t worry – I passed the assessment last November, and if I can, so can you. Below, I’ll share my top tips to help you prepare for and pass this iconic test.
Knowledge
The assessment is first and foremost a test of your knowledge about the mountains. Knowledge is information that has been processed through experience. You can read all the books and learn all the theories you want, but until you get out there and do it for real, it’s just information. This goes for all aspects of Mountain Leader knowledge, from map reading to rope work, equipment, and mountain weather.
Until you get into the hills and experience each of these for yourself, learning about them through trial and error, you will not be ready for assessment. This is the rationale behind the award’s training-consolidation-assessment format. Some of this in-person experience can be gained solo, but everything is more fun with a friend. Find a buddy and go into the mountains for a few days. Get out the ropes and practice on steep ground. Tie knots in front of the TV until your fingers know them. Tie them in gloves.
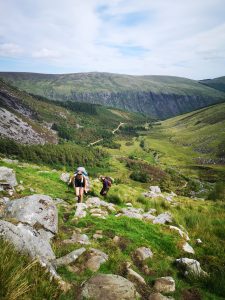
My next piece of advice is to walk, walk, walk. I do not recommend showing up for your assessment with the minimum number of required walks in your logbook; the chances of experiencing every possible weather condition and mountain scenario in that number of walks is limited.
You will know when you have gained the knowledge required to pass the assessment when you can comfortably spend several days in the hills in any weather conditions.
Leadership
Mountain Leader training is heavily focused on map reading. There’s no point in trying to get your group to your target destination if the route is unsafe due to terrain, weather or other factors. The fastest way to get from A to B might be a straight line, but if the safest way is via D or E, then that’s the path you need to take. You have to be able to make these important decisions about your route from the map, which you will only learn from experience.
The true essence of leadership in the hills is being in tune with your group and always being aware of how they are doing on route. In my opinion, this can only be learned by getting out with groups.
I was fortunate to already be working in the outdoor industry as I prepared for my assessment, but I know many people are not. Fortunately, there are still many ways to gain the necessary experience. Seek out opportunities to work with groups. Contact practicing ML’s and ask if you can help out. Volunteer for charities or other groups working in the hills. When doing so, try to ensure that they are using qualified ML’s you can learn from. Join a hillwalking club. Every person walks differently, so the more groups and individuals you can get out with the better.
Fitness
Over the assessment period, you will undoubtedly build a good baseline level of fitness. However, I would also advise you to get ahead by bringing your fitness to a peak in the weeks prior to assessment through a combination of mountain workouts and walks with various weights in your pack.
Remember, at least the first portion of the assessment will involve a walk across rough terrain with 15+ kgs on your back. If you don’t regularly walk with this much weight, then you better get a few practice walks in. An overall strength regime will help you prevent injuries and become accustomed to load carrying.
Nutrition and rest are also vital components of fitness. Make sure to eat and rest well during your final weeks of preparation. Cease all physical activity a few days prior to assessment and just rest up and eat. Take care of these aspects of your fitness throughout the assessment as well. Carry enjoyable, nutritious food that you have eaten in the mountains in the past.
Make sure your sleeping system is comfortable and functional for the conditions expected on your assessment. It’s nearly impossible to get up and shine after a night spent shivering in a sleeping bag that’s too thin.
Equipment
I like to slim my kit list down by making sure everything I carry has at least one vital function. Don’t carry anything that is not vital to your success. If an item can has three or four functions, that’s even better. It’s essential to pack spare batteries, and I recommend also packing a spare head torch and compass – they are lightweight and small, and you never know when one might break. In the real world, I often have to give out spares to group members, and they are always very thankful.
Mountaineering equipment can be expensive, but think of it as a long-term investment. The best equipment will last you years with the proper care (with the possible exception of waterproof outer layers, which seem to leak eventually no matter the quality). That being said, it is possible to save money in some areas. A base layer from Aldi or a fleece from Pennies will keep you just as warm as name-brand items. However, I would never skimp when it comes to my warm layer; a high-quality down jacket can’t be beat. Never, ever try to save money on your waterproof outer lay or sleeping system. Instead, buy high-quality mountain equipment from a reputable brand. It could be the difference between a pass or fail, or even life and death.
Mindset
You can’t achieve anything in life without first learning to control your mind. Even the simplest tasks require turning thoughts into actions, and your mindset governs how hard or easy this is. When we set challenging goals for ourselves, it is essential that we grow the mindset required to achieve them.
The best piece of advice I read prior to my own assessment was to treat the experience as an opportunity to demonstrate just how much you know about the mountains. I embraced this advice, and by the time I got to the hills I was positively looking forward to my opportunity to shine. Self-doubt and self-belief are both significant elements of the assessment. At no point throughout the three days will an assessor tell you whether you are correct or incorrect when you give them a location on a map.
Allowing doubt to creep in at this point can be fatal. My strategy was to treat each relocation as an exam. As soon as I indicated my answer to the assessor, I stepped away, completely forgot about it and moved on. Stand and enjoy the view while you wait for others to approach the assessor. You will know soon enough if you were wrong and have an opportunity to correct at the next relocation.
Final Preperation
You should also try to meet up with some of your fellow candidates in the final weeks. The social aspect of the assessment cannot be discounted, and it’s much easier if you are working with people you have met and gotten to know ahead of time.
It will be greatly rewarding to foster a sense of teamwork in the group; your assessors will notice if you are looking out for each other, as this is an important part of leadership. Despite my careful packing and checklist, I forgot to bring a gas cylinder on my assessment, which I didn’t notice until we arrived at the campsite. Fortunately, my team was able to help me out, and I successfully cooked four meals on borrowed gas without drawing the assessors’ attention to my mistake. A potentially assessment-failing error was saved by teamwork!
Don’t be afraid to book in some extra training before the assessment as well. The person who did your initial training might be available for a day or two of nav training; contact them and see if you can get out. Some mountain instructors run pre-assessment training, which I highly recommend. You’ll likely meet some of your fellow candidates there, too. Or give Wild Summits a call, and we’ll tee up some bespoke training to get you ready for anything you might encounter during the assessment.
Final Note
Remember to enjoy your assessment. If you have prepared fully, it should feel like a breeze, and you’ll only fail if you make a safety error or get very unlucky. Hopefully, it will be the beginning of a long and rewarding lifetime in the hills, whether you make it a career or simply enjoy every chance you get to experience the freedom of being outdoors.